Creating a Simple Location-Based Proximity Search in Drupal
Introduction
Most available documentation for creating location-based searches in Drupal is either outdated or overly focused on complex map implementations. This can make implementing even a basic store locator challenging for developers approaching the task for the first time.
This guide provides a streamlined approach to creating a location-based proximity search in Drupal that prioritizes functionality over visual complexity. While interactive maps are excluded from this tutorial, the foundation built here can be easily extended to include map displays later if needed.
The end result will be a clean, functional search interface where users can enter any location information (such as "London SE1," "10001," or "Chicago, IL") and receive a list of nearby locations sorted by distance. This approach emphasizes usability and performance while remaining adaptable to various business requirements.
For teams frustrated by fragmented or outdated geocoding documentation for Drupal, this guide offers a clear path forward using current modules and techniques, without unnecessary complexity.
Required Modules
First, you'll need to install the following modules (and their dependencies):
- Address (replaces the deprecated AddressField module)
- Geofield
- Geocoder (includes several important submodules)
- Views (comes with Drupal core)
When installing Geocoder, be sure to enable these submodules:
- Geocoder Address: Provides integration between the Address field and Geocoder
- Geocoder Geofield: Provides integration between Geocoder and Geofield
- Geocoder Field: Enables field integration for Geocoder (required by both submodules above)
Installing Geocoder Provider Libraries
In addition to the Drupal modules, you need to install the PHP libraries for your chosen geocoder provider(s) using Composer. Run one of these commands from your Drupal site's root directory:
For Nominatim (OpenStreetMap - no API key required):
composer require geocoder-php/nominatim-providerFor Google Maps (requires API key):
composer require geocoder-php/google-maps-providerFor other providers, visit the complete list of geocoder providers on Packagist to find all available options. There are providers for services like Bing Maps, MapQuest, ArcGIS Online, Here, Yandex, and many more.
Important Note: Use the stable releases of these modules rather than dev versions. The original instructions called for dev versions, but the functionality is now well-established in the stable releases.
Step 1: Configure a Geocoder Provider
Before setting up your content type, you'll need to configure at least one geocoder provider:
- Go to Configuration > System > Geocoder
- Click on the "Providers" tab
Option A: Nominatim (OpenStreetMap - No API Key Required)
- Check the box next to "Nominatim" in the provider list
- Click "Save configuration"
- Click on "Nominatim" to configure its settings:
- Label: You can leave the default or customize it
- Root URL: Leave as the default (https://nominatim.openstreetmap.org) or use a custom Nominatim server if you have one
- User-Agent: Set a custom User-Agent string (required by Nominatim's terms of service) - typically your site name and URL
- Referer: Add a referer header (required) - typically your site URL (e.g., https://example.com)
- Throttle: Configure rate limiting to respect Nominatim's usage policy
- Period: Set the time period in seconds (e.g., 1)
- Limit: Set the number of requests allowed per period (e.g., 1 request per second)
- Click "Save configuration"
Note: Nominatim is free to use but has usage limits. For production sites with high traffic, consider implementing caching or using a paid provider. The OpenStreetMap Nominatim service limits to 1 request per second and requires a valid User-Agent identifying your application.
Option B: Google Maps (API Key Required)
- Check the box next to "Google Maps" in the provider list
- Click "Save configuration"
- Click on "Google Maps" to configure:
- Enter your Google Maps API key (requires signing up with Google Cloud)
- Enable the specific APIs you need (Geocoding API is required for this feature)
- Click "Save configuration"
Tip: For development purposes, Nominatim works great. For production sites with heavy usage, Google Maps often provides more reliable results but requires a paid API key after exceeding the free tier.
Step 2: Set Up Your Location Content Type
- Navigate to Structure > Content types > Add content type
- Create a content type for your locations (e.g., "Store," "Dealer," "Office")
- Add a name and description, then click "Save and manage fields"
Step 3: Add Address and Geofield Fields
- In the "Manage fields" tab, click "Add field"
- Select "Address" from the dropdown and name it (e.g., "Address")
- Configure field settings as needed and save
- Add another field, selecting "Geofield" from the dropdown
- Name it (e.g., "Location")
- On the field settings page, set the widget to "Geocode from another field"
- In the field configuration:
- Set the Geocode method to "Geocode from an existing field"
- Choose your Address field as the existing field
- Select your configured geocoder provider (Nominatim or Google Maps) from the available providers
- Multi-value input handling: If your Address field allows multiple values, choose how to handle them:
- Delta Handling: "Match - each source delta is matched with the same destination delta"
- This ensures that if you have multiple addresses, each address will get its own corresponding geofield value
- Recommended: Check the box "Hide this field in the Content Edit Form" - this prevents users from manually entering coordinates since they'll be automatically generated from the address
- Save your settings
Note: The Address field integration with Geocoder happens through the Geocoder Address submodule you enabled earlier. This allows the system to automatically convert addresses into geographic coordinates stored in your Geofield.
Step 4: Create Sample Content
- Go to Content > Add content > [Your content type]
- Create a few records with real addresses to test the functionality
- Save the content
- Verify that the geofield is being populated correctly (even though it's hidden in the form, the data should be stored in the database)
Step 5: Create the Views-Based Search
- Go to Structure > Views > Add view
- Name your view (e.g., "Store Locator")
- Select your location content type under "Show"
- For display format, select "Fields" (not Content)
- Check "Create a page" to create a page display
- Configure the page settings (path, menu link, etc.) as needed
- Click "Save and edit"
Note: Using "Fields" as the display format is crucial for our proximity-based view as it allows us to add and configure individual fields, including the proximity field that will display distance information.
Step 6: Configure the Proximity Filter and Results
- Add a field: Click "Add" in the Fields section and search for your Geofield name
- Look for "Location Proximity" (where "Location" is the name you gave your Geofield - it may also appear as "field_location Proximity" or similar)
- In the field settings:
- Create a label (e.g., "Distance")
- Set Unit of Measure to your preferred distance unit (km or miles)
- Under Proximity Definition Mode, select "Origin from Proximity Filter" (this connects the field to the exposed filter we'll create next)
- Configure Round and Decimal point options for cleaner display (e.g., 2 decimal places)
- Add a Suffix like "km" or "miles" if desired
- Save
- Add a filter criteria:
- Click "Add" in the Filter criteria section
- Search for your Geofield name and select "Location Proximity" or "field_location Proximity"
- Configure the filter with these settings:
- Check "Expose this filter to visitors, to allow them to change it"
- Optionally check "Required" if you want to force users to enter a location
- Leave "Filter type to expose" at default
- Set "Label" to something user-friendly like "Find locations near"
- Optionally add a "Description" to help users understand how to use the filter
- Set "Operator" to "Is less than" (to show locations closer than a specified distance)
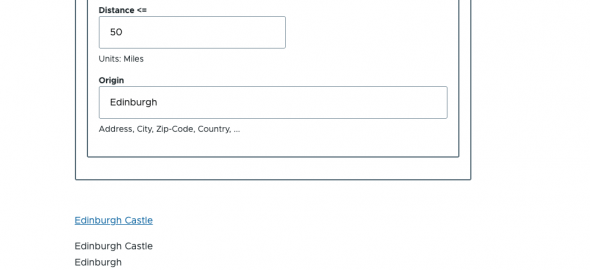
- Set "Distance" to your default search radius (e.g., 50)
- Optionally check "Expose operator" if you want users to be able to change the comparison type
- Select "Unit of Measure" (km or miles)
- Optionally check "Expose Units in the Exposed Filter form" to let users switch between units
- Optionally check "Remember the last selection" for better user experience
- Set "Filter identifier" (typically the default is fine)
- Under "How do you want to enter your proximity parameters", select the option for location search
- Add a "Placeholder" text like "Enter city, address or postal code"
- Set "Proximity Definition Mode" to "Geocode Origin (with Autocomplete option)"
- Optionally check "Expose Summary Description" to provide additional help text
- Set "Default Origin" if you want a default starting location
- Select your configured "Geocoder providers" (Nominatim or Google Maps)
- Check "Enable Autocomplete" for a better user experience
- Save
Step 7: Set Up Sort Criteria (Critical for Proximity Results)
- Click "Add" in the Sort criteria section
- Search for your Geofield name and select "Location Proximity" or "field_location Proximity"
- Configure the sort criteria in this order:
- Optionally check "Expose this sort to visitors, to allow them to change it" (if you want users to be able to toggle the sort order)
- Select "Unit of Measure" (km or miles - should match what you used in the filter)
- Set "Proximity Definition Mode" to "Origin from Proximity Filter" (listed as "Source Proximity Filter" in some versions)
- Set "Order" to "Ascending" (this ensures the closest locations appear first)
- Save
- Remove any other sort criteria: Look for any default sort criteria that may have been added (like Content: Post date), as these can override your proximity sorting. Click "Remove" next to any other sort criteria.
Important: This sort criteria is essential for the proximity search to work correctly. Without it, your results may display in an arbitrary order rather than by distance.
Step 8: Add Other Display Fields
- Add other useful fields to display:
- Title (e.g., store or dealer name)
- Address
- Phone number
- Website
- Opening hours
- Any other fields relevant to your locations
- Arrange the fields in a logical order by dragging them in the Fields section
Step 9: Customize the Search Form
- Under "Advanced" in the right sidebar, find "Exposed Form" and click "Settings"
- Customize the input label, button text, and other form elements as needed
- Save your changes
Step 10: Test Your Proximity Search
- Save your view and navigate to its page
- Enter a location into the search field (e.g., "Chicago, IL" or "90210")
- Submit the search and verify that results appear in order of proximity
- Check that the distance displays correctly for each result
Troubleshooting Tips
- If geocoding isn't working with Nominatim, check that you've set a proper User-Agent and aren't exceeding usage limits
- For Google Maps issues, verify your API key is active and has the correct APIs enabled
- Ensure your content has valid addresses that can be geocoded
- If results aren't sorting by proximity, double-check that you've removed any competing sort criteria
- For international addresses, test with various formats to ensure your chosen provider handles them correctly
Conclusion
With that a functional location-based search has been created, that helps users find the nearest locations. By using Nominatim as the geocoder provider, this solution has been implemented without any API costs, making it perfect for small to medium-sized websites.
For higher-traffic sites or those requiring more precise geocoding, the provider can be easily switched to Google Maps or another premium provider without changing the overall setup.

Comments
Sean (not verified)
Tue, 01/07/2025 - 14:29
Permalink
Now some updated
Now some updated documentation on using Contextual Filters and Solr Search API would be great. There is not much out there.
gareth
Wed, 02/07/2025 - 10:14
Permalink
Great idea. I'll get on that
Great idea. I'll get on that when I get some free time
Add new comment